Do you know Google Buzz? Buzz seem to be divided between those who think it will topple Facebook and those who have already discounted it.
The launch wasn’t a storming success, but Google Buzzis a pretty nifty tool – especially when you start mucking around with it.
Google Buzz is a new way to publish your ideas to the world or just to your closest friends, and start conversations about the things you find interesting. It has an option to see thumbnails with each post, and browse full-screen photos from popular sites.
Here are some tips that help you use Google Buzz in new interesting ways.
1. Disable email notifications
When someone replies to one of your Google Buzz messages, Google sends an email notification to your Gmail account. If you don’t like the notifications or they clutter your inbox, create a filter that archives or deletes all the messages that are labeled “buzz” (a built-in Gmail label). Make sure you type label:buzz (you could also use is:buzz) in the “Has the words” box and ignore Gmail’s warning.
2. Connecting Buzz to Twitter via Google Reader Shared Items
If you’re sharing links via Buzz you’ll probably want to share them with your Twitter followers, too. You can do that in a few different ways.
Twitterfeed lets send anything you share on Google Reader to your Twitter account. Just go to your Google Reader Shared Items page, copy the Atom feed and paste it into Twitterfeed. Then just authorize your Twitter account to sync them up.
Reader2Twitter uses the pubsubhubbub protocol to perform real-time sync. A new version has already been released that works specifically with Google Buzz. Just sign in with your Twitter account via Oauth. You can even add your bit.ly account so you can shorten URLs and track analytics. All in all, it’s a simple but powerful little tool.
Facebook’s FriendFeed can also connect Google Reader to Twitter very easily. Just click “add/edit” on your Friendfeed profile and look for the Google Reader service under “News.”
3. Sharing Stuff with Google Reader
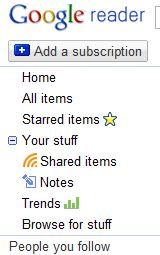 If you use Google Reader then whatever you share there shows up in your Google Buzz stream. It’s all done via the “Shared items” feature. Look for it under “Your stuff” in Google Reader.
You can share anything you’re viewing in Google Reader by clicking the “Share” button at the bottom of every post you’re reading. (Click “Unshare” to stop sharing it)
You can set privacy controls and only allow specified groups of people to view the items you share. This could be important for those of you that are using Buzz for work.
- Go to Google Reader
- Click on “Shared items”
- Click on “Sharing Settings”
- Change the setting for “Your shared items can be viewed by” to: “Protected (Shared with Selected Groups)”
You can manage your groups via Gmail’s Contacts. Note that selecting the “Public” option means just that: Everyone is be able to see everything you share via Google Reader and Buzz.
4. Don’t Like Google Buzz Or If It’s Not For You? Then…

If you do not like Google Buzz or it’s really not for you so there is a way that you can keep it out of your Gmail inbox. You would need to go down on the inbox page and there is an option that say “turn off buzz”
5. Hide Your Buzz Contact List from Prying Eyes
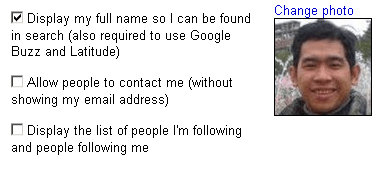
It is not a good thing to show to the world the contact info and email (Google profiles are generated from your Gmail account). Because Buzz is not centered on follower numbers (like Twitter is) you should definitely and first hide that information.
The way to do that is by editing your Google profile and checking off the option “Display the list of people I’m following and people following me”.
5. Post from email and SMS
 A really cool feature that Buzz offers from the get-go is email posting. Just email to [email protected] from your Gmail account (either web or mobile) and the Subject of your email becomes the title of a new buzz. You can also attach a picture file and it will be added to your buzz.
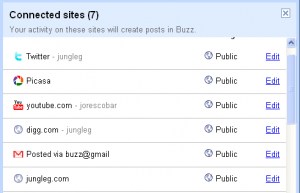
You can also fine tune who sees those email posts, by going to your “Connected Services” page (just make sure you’ve posted at least one buzz email) and select which group sees those.
6. Mastering Google Buzz Keyboard shortcuts
Using Buzz with your mouse (or touchpad) can be a pain, as posts can be short or long based on the number of comments they have and embedded media.
If you are a Google Reader power user, you already know about the keyboard shortcuts there. You’ll be happy to know that they too work on Buzz.
First, you need to enable keyboard shortcuts on Gmail. Just go to the Gmail settings page and enable keyboard shortcuts.
These are the two keyboard shortcuts I use the most: “n” and “p” allow you to move to the next and earlier buzzes. You will see a little arrow on the left top side of the buzz to let you know which one is selected. That way you can navigate through the buzzes fairly quickly.
The second one is the “m” key, which mutes a buzz. That way, if you are not interested in the comments or activity of a buzz, you just mute it and it will be forever archived, unclogging the good stuff you do want to follow. I also believe by muting buzzes, Google’s system can start to learn what’s interesting to you and what isn’t (although that’s more of a hunch than a statement, maybe someone from Google can confirm that).
This is a must-have for power users. The Google Buzz Cheat Sheet is a keyboard printout with notes on top of the keys to help you learn and remember the quick shortcuts built into Buzz. Note that you have to enable keyboard shortcuts in Gmail Labs (Click Settings, Labs, and “Enable” Keyboard Shortcuts).
7. Don’t import echoes
One thing that gets really annoying is echoes of content from the same source. For example, if you are importing your Google Reader items to Twitter and you are also importing Twitter to Google Buzz, users will see your shared Google Reader items twice. Same goes for FriendFeed (it’s usually a safe bet to not import FriendFeed into Buzz, unless you’re just posting original content there). Just make sure you’re bringing the good stuff just once to your buzz community.
8. Mark Up Your Text
Google Buzz understands some very basic text markup language. That means you can spice up your text entries on Buzz by using bold text, italics and strikethroughs. Here’s what you do:
- *Make your text bold by placing an asterisk at each end of your word or sentence*.
- Using underscores at each end will italicize this Buzz comment_.
- Use a dash at each end for a strikethrough–
- For an em–dash, just place two hyphens side–by–side
9. Get Those Buzzes Out of Your Inbox
Three kinds of Buzz updates will be automatically sent to your inbox: Whenever anyone comments on a buzz created by you; when another user comments on a buzz created by someone else that you have also commented on; or when someone tags you in a Buzz through the @reply system.
Google send these notifications to you, because the company believes you’ll want to be notified when things happen on Buzzes you are actively participating in. But if you find these notifications annoying, Google doesn’t have an obvious way to change this behavior. So it’s up to you to use the power of Gmail filters and labels to take control of your buzzes.
10. Subscribe to Someone’s Buzz via RSS
If you want to subscribe to someone’s Buzz in your feed reader, just go to their Google profile page. Once there, you’ll see the orange RSS icon appear in the browser’s address bar. Click the icon to add Buzz to your favorite feed reader.
11. Send direct messages
If you’d like to send a private message to someone, type @ and use Gmail’s autocomplete feature to find the email address of your contact. After typing the message, make sure that the private option is selected, click on “Post to other groups” and create an empty group. You could call it “No one”, “Empty group” etc. Now you can send your message.
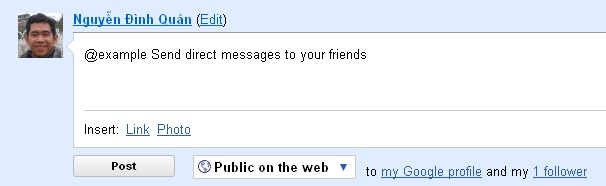
When you send a private message, Google Buzz lets you select one or more groups that will receive message, but you can also include the contacts in your message.
12. Link to a Google Buzz message
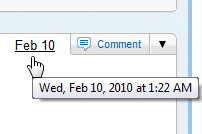 If a message is public, it has a permalink that could be used to share the discussion. Gmail shows the links without having to use additional options, but it’s not obvious that the timestamp of the message is actually a permalink.
13. Hide Google Buzz’s counter
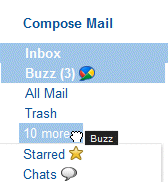 Google Buzz’s message counter is distracting, so it would be nice to hide it. Unfortunately, there’s no Gmail option that lets you hide counter, but you can hide the link to Google Buzz. Drag “Buzz” to the “X more” drop-down and you can hide the Buzz label.
14. Find public Google Buzz messages
If you thought that Google Buzz’s search box is restricted to your social connections, think again. Google Buzz’s search feature shows the latest public messages that match your query.
Some useful searches:
author:<insertname>@gmail.com – find all the messages written by a specific user (you can also use a partial name instead of an email address)
commenter:<insertname>@gmail.com – find all the messages that have a comment from a specific user
has:photo, has:video, has:link – restricts the results to messages that include photos, videos or links (such as: vancouver has:photo)
source:flickr, source:twitter, source:reader- restricts the results to messages imported from Flickr, Twitter, Google Reader (such as: vancouver source:flickr)
15. View Google Buzz photos in a slideshow
When you upload photos to Google Buzz, they’re added to Picasa Web Albums. If you click on a thumbnail, Google Buzz will open a light box to help you quickly navigate between images. Unfortunately, there’s no option to view the images in a slide show, but Picasa Web Albums has this feature and there’s a small link that opens the photo album. Click on “view all” and you can select the slide show option, export photos using Picasa or print photos.
16. Access Buzz before it’s enabled for your account
If Google hasn’t enabled buzz for your account yet, you can get a sneak peek by turning on Multiple Inboxes in Gmail Labs and set is:buzz in one of the empty panes. Bam! Now you’re buzzed! Sorry this doesn’t work for Google Apps yet, but I’d assume that once they start to add it to Apps, you will be the first to know!
17. Add a “Buzz it” widget to your blog
Have a blog? Increase your traffic by adding a simple Buzz widget. In your blog’s theme, simply use the following URL (replace the appropriate data):
[code lang=”xml” htmlscript=”false”]<a href="http://www.google.com/reader/link?url=[YOUR POST’S URL HERE]&title=[YOUR POST’S TITLE HERE]&snippet=[YOUR POST’S DESCRIPTION HERE]&srcURL=[YOUR BLOG’S URL HERE]&srcTitle=[YOUR BLOG’S NAME HERE]"><img src="buzz-icon.png" alt="" /> Buzz it!</a>[/code]
18. View a summary of your own Buzz activity at Google Dashboard
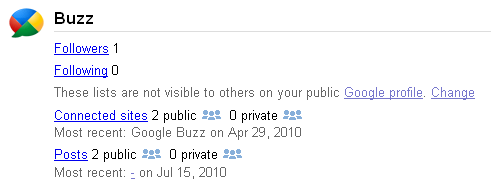
The Google Dashboard provides a private, consolidated summary of the data associated with your Google account, as well as direct links to control your personal settings. As of today, Buzz has its own section on the Dashboard, so you can see how many people you’re following, how many people are following you, and information about your recent posts, comments, and likes. You can also access your Buzz settings right there on the page.
That’s all for now – but if you have Buzz tips of your own, feel free to share them in the comments below!