After install a high quality WordPress theme, you find it has a Theme Option page. Per theme, developer will make their own Option page (functions, features, layout …) so it can not be compatible with your theme or others. Let’s me know what’s you feel when changing to new WordPress theme then you start learning again to re-configure WordPress and you’ll see why that’s a bad thing for WordPress publishers. That’s why I always disliked about theme settings pages was how vastly different they would get.
The Theme Customizer was introduced since WordPress version 3.4 then it’s become a relatively new way of WordPress Themes to provide you with options. It allows for an editing environment where theme options can be tried by the administrator before being applied to the live site. Currently, I’m using WordPress Theme Customizer as my default theme options instead build my own or using other theme options way.
In this tutorial, we will look at exactly how this feature can be added to a theme and I show you how to create your own classes to extend the controls to make your own Customizer Custom Controls, since not all fields and requests are in the core already. You can access existing solutions of the community or create your own classes.
Note:
- The WordPress theme we will use for this example is NARGA WordPress Starter Theme. If you use it for your theme, please change the correct variables and option’s values.
- There are a few different ways to implement the theme customizer and save the customization settings. This tutorial will focus on the
theme_optionsmethod. If you don’t know what that means, that’s okay. You don’t need to have any understanding the different methods to follow along with this tutorial.
We Recommend Digital Ocean
NARGA.NET strongly recommends for all of your web hosting needs. For VPS cloud hosting at just $5/month.
Visit DigitalOcean.com then Get $10 Free Credit Digital Ocean Promo Code
How am I build perfect VPS with low RAM/CPU for Hight-Traffic WordPress websites
How Theme Customiser Works?
The theme customiser is split up into 4 areas.
- Theme Customiser Manager
- Customiser Settings
- Customiser Control
- Customiser Sections
To add your own options to the theme customizer, you need to use a minimum of 2 hooks:
customize_register: This hook allows you define new Theme Customizer sections, settings, and controls.wp_head: This hook allows you to output custom-generated CSS so that your changes show up correctly on the live website.
Register Theme Customizer page to the admin menu
Any new WordPress Theme Customizer settings, sections, or controls must be defined from within a customize_register action. This action automatically loads the $wp_customize object, which is an instance of the WP_Customize_Manager class. The first step is to add the Theme Customizer with the following code in functions.php:
function themename_customize_register($wp_customize){
    // Add all your settings, sections and controls on to the $wp_customize_manager
}
add_action('customize_register', 'themename_customize_register');
WordPress does include a few built-in sections. If you want to use any of the existing, built-in ones, you don’t need to declare them with add_section(). Instead, refer to them by name. The following sections are built-in.
title_tagline– Site Title & Taglinecolors– Colorsheader_image– Header Imagebackground_image– Background Imagenav– Navigationstatic_front_page– Static Front Page
Adding new Section
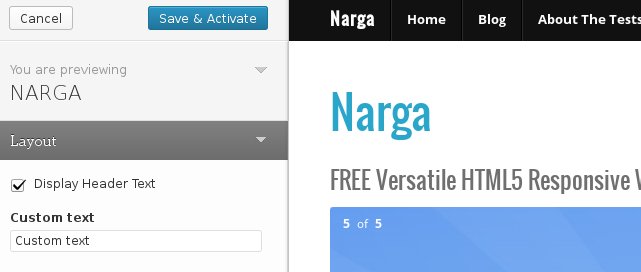
Sections will split the settings into different groups to make it easier to display the settings. Since it’s much easier to work with real examples, here’s what we’re going after:
- A section named as Layout
- Include a checkbox and a text input form.
First thing to add to Theme Customizer is Layout section:
$wp_customize->add_section(
	'layout_section', # Section ID to use in Option Table
	array(# Arguments array
		'title' => __('Layout', 'narga'), # Translatable text, change the text domain to your own
		'capability' => 'edit_theme_options', # Permission to change option date
		'description' => __('Allows you to edit your theme's layout.', 'narga')
	)
);
The method you can use on the sections are:
get_section($id)– Gets the section by section ID.remove_section($id)– Removes the section by section ID.add_section($id , array())– Adds a new section to the customiser manager, the first parameter is the ID of the section, the second parameter is an array of options for the section.
A Section without Settings will not display in Customize screen. The setting is the component that will be used on the form for the theme customiser. The settings will live inside the sections of the page. They are used to store data in the database and change the settings of the theme styles. So we’ll add setting to Layout Section:
# Add checkbox section to enable Custom Text
$wp_customize->add_setting('narga_options[use_custom_text]', array(
    'capability' => 'edit_theme_options',
    'type'       => 'option',
    'default'       => '1', # Default checked
));

$wp_customize->add_control('narga_options[use_custom_text]', array(
    'settings' => 'narga_options[use_custom_text]',
    'label'    => __('Display Custom Text', 'narga'),
    'section'  => 'layout_section', # Layout Section
    'type'     => 'checkbox', # Type of control: checkbox
));

# Add text input form to change custom text
$wp_customize->add_setting('narga_options[custom_text]', array(
    'capability' => 'edit_theme_options',
    'type'       => 'option',
    'default'       => 'Custom text', # Default custom text
));

$wp_customize->add_control('narga_options[custom_text]', array(
        'label' => 'Custom text', # Label of text form
        'section' => 'layout_section', # Layout Section
        'type' => 'text', # Type of control: text input
));
Settings and Controls
The method you can use on the settings and controls are:
get_setting($id)– Get the setting by setting ID.remove_setting($id)– Removes the setting by setting ID.add_setting($id , array())– Adds a new setting to the customiser manager, the first parameter is the ID of the setting, the second parameter is an array of options for the setting.
get_control($id)– Get the control by control ID.remove_control($id)– Removes the section by control ID.add_control($id , array())– Adds a new control to the customiser manager, the first parameter is the ID of the control, the second parameter is an array of options for the control.
There are 4 options you use in the array of the add_setting() method.
- Default – The default value used on the option.
- Type – The type setting you are creating can either be option or theme_mod‘.
- Capability – The capabilities a user must have to change the options on the theme.
- Transport – This is the transport that will provide you with a live preview of the theme. The default value is refresh this will refresh the entire preview panel. The other value you can use is postMessage this should be used for when you are changing HTML or CSS as you can use Javascript to change the preview.
To add a control we need to use the add_control() method with a ID and an array of settings, these settings are:
- Label – The text to be used in the setting.
- Settings – The ID of the setting to be used, you can leave this blank and it will use the same ID as the control.
- Section – The ID of the section that you are adding the setting.
- Type – The type of setting to be used, can be text, checkbox, radio, select, dropdown-pages
- Choices – A set of options for the select box or radio buttons. Be careful using this property as it will be removed in future releases.
- Priority – The order of the settings, the lower the setting the earlier the setting will appear.
Access the stored setting from the theme
And finally, after you added those two code snippets to function you hooked into customize_register action hook (first code snippet in this post), take a look into your Theme Customizer:
Using Theme Customizer settings values in your theme
Just wait, before using Theme Customizer settings values in your theme, you need review code snipets above. Do you find narga_options[theme_settings]? That is one of two methods to store options data in _options table. With narga_options[theme_settings] you can store theme options as array in WordPress database and get the valua to use in favourable conditions. Below is small function that helps you control Theme Options data easier than before.
/**
 * Returns the options array for NARGA
 * @since NARGA 1.3.5
 */
function narga_options($name, $default = false) {
    $options = (get_option('narga_options')) ? get_option('narga_options') : null;
    // return the option if it exists
    if (isset($options[ $name ])) {
        return apply_filters('narga_options_$name', $options[ $name ]);
    }
    // return default if nothing else
    return apply_filters('narga_options_$name', $default);
}
How to use:
- Store settings value with
narga_options[theme_settings]. - Get theme’s settings from database with
narga_options('theme_settings').
That’s very easy to use.
Note: There are a few different ways to implement the theme customizer and save the customization settings. This tutorial will focus on the
get_option()method. From the start, I usedget_theme_mod()but after I foundget_option(), I’ve known it better. If you don’t know what that means, that’s okay. You don’t need to have any understanding the different methods to follow along with this tutorial.
Using the Theme Customizer to Add Content
Displaying this stuff is easy. Depending on if you set your setting_type(), you can display it in the two following ways:
/**
 * Query Theme option.
 *
 * @param narga_options().
 */
echo narga_options('theme_option');
Configure Live Preview with your custom setting
This step is optional, but can dramatically improve user experience. This technique uses a little custom javascript in combination with your settings for a faster, more interactive WordPress Theme Customizer. If this is not used, then updates are rendered by reloading the entire preview window.
In order to create this custom javascript handler, you need to do the following:
- Make sure your settings are all configured for live preview
'transport'=>'postMessage' - Create a new Javascript file (e.g. theme-customize.js) to handle the live changes
- Create a hook for
customize_preview_initthat enqueues the js file
Note: I got a little confused with this feature, it’s not hard but it’s not requirement so I skipped it. Don’t like me, if you create WordPress theme options, let’s researching about it. It’s worth to try.
By default, after change theme option, it’s refresh by itseft, that mean all of WordPress’s Theme Customizer settings use 'transport'=>'refresh'. To use custom live preview, make sure that any custom settings you’ve created have 'transport'=>'postMessage' set. This will disable the automatic refresh behavior when you change that setting, allowing you to define any custom javascript handling you like. If the setting is exist, you can easily update their transport method(s) within your customize_register hook function like this:
/**
 * Add postMessage support for site title and description for the Theme Customizer.
 *
 * @param WP_Customize_Manager $wp_customize Theme Customizer object.
 */
function narga_customize_register($wp_customize) {
    $readmore = narga_options ('post_readmore');
    $wp_customize->get_setting('blogname')->transport         = 'postMessage';
    $wp_customize->get_setting('blogdescription')->transport  = 'postMessage';
    $wp_customize->get_setting('header_textcolor')->transport = 'postMessage';
}
add_action('customize_register', 'narga_customize_register');
The next step, we will create a custom javascript to control the event when you changing theme options.
/**
 * This file adds some LIVE to the Theme Customizer live preview. To leverage
 * this, set your custom settings to 'postMessage' and then add your handling
 * here. Your javascript should grab settings from customizer controls, and
 * then make any necessary changes to the page using jQuery.
 */
(function($) {

	// Update the site title in real time...
	wp.customize('blogname', function(value) {
		value.bind(function(newval) {
			$('#site-title a').html(newval);
		});
	});

	//Update site title color in real time...
	wp.customize('header_textcolor', function(value) {
		value.bind(function(newval) {
			$('#site-title a').css('color', newval);
		});
	});

	//Update site background color...
	wp.customize('background_color', function(value) {
		value.bind(function(newval) {
			$('body').css('background-color', newval);
		});
	});

	//Update site title color in real time...
	wp.customize('mytheme_options[link_textcolor]', function(value) {
		value.bind(function(newval) {
			$('a').css('color', newval);
		});
	});

})(jQuery);
As you see, the Javascripts snippet above was from WordPress Codex, just custom it as you want:
/**
 * This file adds some LIVE to the Theme Customizer live preview. To leverage
 * this, set your custom settings to 'postMessage' and then add your handling
 * here. Your javascript should grab settings from customizer controls, and
 * then make any necessary changes to the page using jQuery.
 */
(function($) {
...

	// Update the custom text in real time...
	wp.customize('narga_options[custom_text]', function(value) {
		value.bind(function(to) {
			$('#custom-text a').html(to);
		});
	});

...
})(jQuery);
Here is Javascripts function to handle the live changes:
/**
 * This file adds some LIVE to the Theme Customizer live preview. To leverage
 * this, set your custom settings to 'postMessage' and then add your handling
 * here. Your javascript should grab settings from customizer controls, and
 * then make any necessary changes to the page using jQuery.
 */
(function($) {
...

wp.customize('YOUR_SETTING_ID', function(value) {
	value.bind(function(newval) {
		//Do stuff (newval variable contains your "new" setting data)
	});
});

...
})(jQuery);
Finally, you simply need to ensure your javascript is enqueued. To ensure that the file is loaded only on the Theme Customizer admin screen (and not your live website), you should use the customize_preview_init hook.
/**
 * Binds JS handlers to make Theme Customizer preview reload changes asynchronously.
 *
 * Since NARGA v1.6
 *
 */
public static function narga_customize_preview_js() {
	wp_enqueue_script('narga_customizer', get_template_directory_uri() . '/javascripts/customizer.js', array('customize-preview'), '20130916', true);
}
add_action('customize_preview_init', 'narga_customize_preview_js');
Additional Control Types
We’ve already created a textbox setting and added it to our theme, but that’s just the beginning. There are a number of other standard control types provided by WordPress.
Radio
/**
 * Radio Control Type
 *
 * Since NARGA v1.6
 */
$wp_customize->add_setting('narga_options[color_scheme]', array(
    'default'        => 'value2',
    'capability'     => 'edit_theme_options',
    'type'           => 'option',
));

$wp_customize->add_control('themename_color_scheme', array(
    'label'      => __('Color Scheme', 'narga'),
    'section'    => 'themename_color_scheme',
    'settings'   => 'narga_options[color_scheme]',
    'type'       => 'radio',
    'choices'    => array(
        'value1' => __('Choice 1', 'narga'),
        'value2' => __('Choice 2', 'narga'),
        'value3' => __('Choice 3', 'narga'),
   ),
));
Checkbox
You’ve read it.
/**
 * Checkbox Control Type
 *
 * Since NARGA v1.6
 */
$wp_customize->add_setting('narga_options[checkbox_test]', array(
    'capability' => 'edit_theme_options',
    'type'       => 'option',
));

$wp_customize->add_control('display_header_text', array(
    'settings' => 'narga_options[checkbox_test]',
    'label'    => __('Display Header Text', 'narga'),
    'section'  => 'themename_color_scheme',
    'type'     => 'checkbox',
));
Select box
/**
 * Select Box Control Type
 *
 * Since NARGA v1.6
 */
$wp_customize->add_setting('narga_options[header_select]', array(
    'default'        => 'value2',
    'capability'     => 'edit_theme_options',
    'type'           => 'option',

));
$wp_customize->add_control('narga_options[example_select_box]', array(
    'settings' => 'narga_options_[header_select]',
    'label'   => __('Select Something:', 'narga'),
    'section' => 'themename_color_scheme',
    'type'    => 'select',
    'choices'    => array(
        'value1' => __('Choice 1', 'narga'),
        'value2' => __('Choice 2', 'narga'),
        'value3' => __('Choice 3', 'narga'),
   ),
));
Image Upload
Image upload is a file input type and allows users to upload an image. Handy for letting them set their logo.
/**
 * Image Upload
 *
 * Since NARGA v1.6
 */
$wp_customize->add_setting('narga_options[image_upload_test]', array(
    'default'           => 'image.jpg',
    'capability'        => 'edit_theme_options',
    'type'           => 'option',
));

$wp_customize->add_control(new WP_Customize_Image_Control($wp_customize, 'image_upload_test', array(
    'label'    => __('Image Upload Test', 'narga'),
    'section'  => 'themename_color_scheme',
    'settings' => 'narga_options[image_upload_test]',
)));
File Upload
Adds a custom file input. Good for allowing the end user to upload files I guess. Maybe a custom favicon would use this?
/**
 * File Upload
 *
 * Since NARGA v1.6
 */
$wp_customize->add_setting('narga_options[upload_test]', array(
    'default'           => 'arse',
    'capability'        => 'edit_theme_options',
    'type'           => 'option',

));

$wp_customize->add_control(new WP_Customize_Upload_Control($wp_customize, 'upload_test', array(
    'label'    => __('Upload Test', 'narga'),
    'section'  => 'themename_color_scheme',
    'settings' => 'narga_options[upload_test]',
)));
Color Picker
Displays a colour picker. Gives the user the option to destroy your theme with their bad taste. This input seems to have a hex colour callback for sanitizing the value.
/**
 * Color Picker
 *
 * Since NARGA v1.6
 */
$wp_customize->add_setting('narga_options[link_color]', array(
    'default'           => '000',
    'sanitize_callback' => 'sanitize_hex_color',
    'capability'        => 'edit_theme_options',
    'type'           => 'option',

));

$wp_customize->add_control(new WP_Customize_Color_Control($wp_customize, 'link_color', array(
    'label'    => __('Link Color', 'narga'),
    'section'  => 'themename_color_scheme',
    'settings' => 'narga_options[link_color]',
)));
Pages Drop-down List
/**
 * Pages Drop-Down List
 *
 * Since NARGA v1.6
 */
$wp_customize->add_setting('narga_options[page_test]', array(
    'capability'     => 'edit_theme_options',
    'type'           => 'option',

));

$wp_customize->add_control('themename_page_test', array(
    'label'      => __('Page Test', 'narga'),
    'section'    => 'themename_color_scheme',
    'type'    => 'dropdown-pages',
    'settings'   => 'narga_options[page_test]',
));
This displays a list of your pages. I guess you could allow the user to set pages for something custom.
Custom Control Types
How about a textarea? How can I list all pages, categories in drop-down selection?… As the theme customiser page is still quite new there aren’t that many controls to use on your page. This is where you will need to create your own custom controls.
All the custom controls you make are going to be classes. The reason we have to create our class in here is because we need to make our new class extend the built in WP_Customize_Control class, and that class only gets loaded and defined when we’re actually using the customizer.
First we start off by creating a new textarea class for our custom control, this class needs to extend (inherit) from the WP_Customiser_control so you need to make sure this class exists before you define your new class. We’ll place the following section of code into the function we just mentioned:
Textarea Form
/**
 * NARGA TextArea Control Class
 *
 * Since NARGA v0.5
 **/
if (class_exists('WP_Customize_Control')) {
    # Adds textarea support to the theme customizer
    class NargaTextAreaControl extends WP_Customize_Control {
        public $type = 'textarea';
        public function __construct($manager, $id, $args = array()) {
            $this->statuses = array('' => __('Default', 'narga'));
            parent::__construct($manager, $id, $args);
        }

        public function render_content() {
            echo '<label>
                <span class="customize-control-title">' . esc_html($this->label) . '</span>
                <textarea rows="5" style="width:100%;" ';
            $this->link();
            echo '>' . esc_textarea($this->value()) . '</textarea>
                </label>';
        }
    }

}
As your class inherits from WP_Customize_Control you will have access to override a number of methods to perform the tasks you want.
enqueue()– Add scripts or styles to the classvalue() - Get a setting valueto_json()– Pass the settings parameters to the javascript by JSON.check_capabilities()– Checks if the theme and user has the capabilities of the control.maybe_render()– Checks if the correct capabilities are set to render the control.render()– Will render the control on the page by calling render_content().render_content()– Method used to render the control.
For this control we only need to change the render_content() method to display what’s you want. Now we can add a setting to our customizer that makes use of the textarea class we just created.
$wp_customize->add_setting('default_keywords');

    $wp_customize->add_control(new NargaTextAreaControl($wp_customize, 'default_keywords', array(
        'label'     => __('Default Keywords', 'narga'),
        'section'   => 'narga_pro_seo',
        'settings'  => 'default_keywords',
        'priority'  => 5,
   )));
Alternatively, we’re creating Categories, Pages Drop-Down List control
Categories Drop-Down List Control
/**
 * NARGA Category Drop Down List Class
 *
 * modified dropdown-pages from wp-includes/class-wp-customize-control.php
 *
 * @since NARGA v1.0
 */
if (class_exists('WP_Customize_Control')) {
class WP_Customize_Dropdown_Categories_Control extends WP_Customize_Control {
    public $type = 'dropdown-categories';

    public function render_content() {
        $dropdown = wp_dropdown_categories(
            array(
                'name'             => '_customize-dropdown-categories-' . $this->id,
                'echo'             => 0,
                'hide_empty'       => false,
                'show_option_none' => '— ' . __('Select', 'reactor') . ' —',
                'hide_if_empty'    => false,
                'selected'         => $this->value(),
           )
       );

        $dropdown = str_replace('get_link(), $dropdown);

        printf(
            '<label class="customize-control-select"><span class="customize-control-title">%s</span> %s</label>',
            $this->label,
            $dropdown
       );
    }
}
}
Now this custom control is created we can go to the theme customiser manager and add this to a customiser manager control.
$wp_customize->add_setting('narga_options[featured_category]', array(
        'default'        => '',
        'type'           => 'option',
        'capability'     => 'manage_options',
   ));

    $wp_customize->add_control(new WP_Customize_Dropdown_Categories_Control($wp_customize, 'narga_featured_category', array(
        'label'    => __('Featured Category', 'narga'),
        'section'  => 'narga_featured_categories',
        'type'     => 'dropdown-categories',
        'settings' => 'narga_options[featured_category]',
        'priority' => 1,
   )));
Tags List
/**
 * NARGA Tags List Class
 * modified dropdown-pages from wp-includes/class-wp-customize-control.php
 * @since NARGA v1.7
 */
if (class_exists('WP_Customize_Control')) {
    class Tags_Dropdown_Custom_control extends WP_Customize_Control {

    public function render_content() {?>
<label>
<span class="customize-tags-dropdown"><?php echo esc_html($this->label); ?></span>
<select name="<?php echo $this->id; ?>" id="<?php echo $this->id; ?>">
<?php
                          $args = wp_parse_args($this->args, array());

                          $tags = get_tags($args);
                          foreach ($tags as $tag) {
                            echo '<option value="'.$tag->term_id.'" '.selected($this->value, $tag->term_id).'>'.$tag->name.'</option>';
                          }?>
</select>
</label>
<?php }
    }
}
Date Picker
/**
 * NARGA Date Picker Class
 * @since NARGA v1.7
 */
if (class_exists('WP_Customize_Control')) {
    class Date_Picker_Custom_control extends WP_Customize_Control {
          public function enqueue() {
            wp_enqueue_style('jquery-ui-datepicker');
          }
          public function render_content() { ?>
<label>
<span class="customize-date-picker-control"><?php echo esc_html($this->label); ?></span>
<input type="date" id="<?php echo $this->id; ?>" name="<?php echo $this->id; ?>" value="<?php echo $this->value(); ?>" class="datepicker" />
</label>
<?php }
    }
}
Conclusion
You have also seen how you can create your own custom controls to display exactly the data you need. If you have made any other controls please contribute here in comments section, hopefully together we can build a good library of controls to use.
Did I miss anything? If you have any suggestions on improving this developer’s guide, or even if you just found it helpful and want to let me know, please don’t hesitate to contact me or leave a comment below.
Sources/Further reading
- Theme Customization API.
- Digging Into the Theme Customizer Series by Lee Pham
- Otto’s WordPress Cuztomization Posts
- Exploring the WordPress Theme Customizer by Abban Dunne
- WordPress Theme Customizer Custom Controls by Paulund
- Extending The WordPress Theme Customizer Boilerplate by Slobodan Manic
Hi,
is there a way to define a reset button, to set each custom option to the default value ?
Thanks
I have two solution are global reset button and each option’s reset button:
Global Reset Button
// Removes all theme mods
remove_theme_mods();

// If we haven't already declared them, declare some default settings
$defaults = array(
	'links' => 'ddd',
	'link_hover' => 'aaa',
	'headers' => 'fadccd'
	);

// Re-create all the default settings.
foreach ($defaults as $key => $value) {
	$wp_customize->add_setting( $key , array( 'default' => $value ) );
}
Each Custom Option’s Reset Button
Use one default valua in
$defaultarrayHi, thanks for this great tuttorial. I made a custom theme and i created custom theme options panel. Everything works good but i dont see my theme options values in customize page.How can i get my theme options values to display and edit in customize page.
Thanks again.
I am adding wp_editor as custom control but not working because content of wp_editor rexrarea not saving
Thanks for the tut! Very helpful and best one I found online.
Hi,
Great Tutorial.
I created custom control of textboxes. The textboxes are in foreach loop. The values stored are in array eg. theme[‘key’][‘1’].
When I edit the textbox, the save and publish button is still disabled.
I cant use this->link() here. How to enable save and publish for two dimensional array values.
Thanks
I will recheck and reply to you soon
I want to check exist of Checkbox, could you give me an example?