Themes are among the top elements that make WordPress the most popular Web CMS and blogging platform.
These are the first set of files that define the design and functionality of a WordPress site. Each Theme is different, having multiple choices of appearances (color and structure for site owners to choose from) that can instantly change the complete website presentation.
In this tutorial, we will take you through a step-by-step process of writing codes that result in a completely functioning WordPress theme.

No prior knowledge of WordPress required. This is the perfect guide to start even if you are completely new to WordPress. However, you must be conversant with basic HTML/CSS/JS prototype to build your own Themes from scratch.
Set up a Local Development Environment
To get started, you need to set up a development environment suitable for WordPress development that includes a local server stack and a text editor.
A local server stack is a server that you would need to configure on your PC, for example, LAMP (Linux Apache MySQL PHP) or WAMP (Windows Apache MySQL PHP). MAMP (for Mac) and XAMPP (Mac or Windows) are also the options that are bundled with all of the above listed technologies to quickly setup your environment.
A text editor on the other hand is required to write the codes for the theme. If you have a basic version of a good text editor, it can speed up your development process. A fully integrated text editor with tools for debugging and testing, may even support for WordPress development. Some popular choices are Atom, Sublime Text, and PhpStorm.
Anatomy of a Theme
WordPress Themes consist of three main types of files, except from the images and JavaScript files. These are:
- The stylesheet called style.css – which defines the appearance (visual design and layout) of website.
- WordPress template files – which allow the website to generate information from the WordPress database to be displayed on the website.
- The optional functions file (functions.php) – which is a part of the WordPress Theme files.
Let’s jump into the main task now
To get started, you need a basic blog theme that will be modified into a fully functional customized WordPress theme of your own. For example, here is an image of Basic blog theme that can be customized.

If you do not have your own layout to work with, you can download any one of these: Bootstrap, Foundation, Skeleton.
No matter which template you use for your new theme, the only point is to have a basic website to work on. Don’t be afraid to use your own website if you wish to improve its design or features. Even if it is an ecommerce website, just continue with it. However, for this you may also need to learn about the functionality of wordpress ecommerce solution platform – WooCommerce. And follow it by creating a directory on your PC with title ‘blog.css and index.html to get started.
I’m going to use a local server and MAMP, and a simple starter Bootstrap template to convert it into WordPress theme for this article.
Install WordPress
Follow the steps below or checkout the guide on WordPress.org about how to install WordPress.
Create a folder for WordPress – Make one empty directory somewhere on your PC and point your virtual host or localhost to it.
Download WordPress – Visit WordPress.org to download its latest version.
Unzip WordPress – Unzip the downloaded program folder, and place its contents into your directory on your computer.
Create a database – Now, when you check the local server in your browser, you will get this message “Error establishing a database connection”.
To rectify this error – In your MAMP system, now click “Open WebStart page”. Now, click phpMyAdmin. Then click Databases>create database. Now name it as you like, I am naming it “mywordpresstheme”.
Final step – Now find wp-config-sample.php from your system directory. Here you need to change the username, database name, password and $table_prefix. For example – DB_NAME: mywordpresstheme, DB_USER: XYZ, DB_PASSWORD: ABC. For $table_prefix enter security numbers or letters, for example: 123abc.

Now visit https://api.wordpress.org/secret-key/1.1/salt and here you need to replace ‘put your unique phrase here’ with the generated code. Save this file as “wp-config.php” in the directory you created on your PC.
Visit your website now and input, “username, e-mail address, password”. You will then be redirected to /wp-login.php. Here you need to enter your details to log into the system backend. And after that, when you visit your main URL, you will be able to see default WordPress blog.
Create your customized theme
We are going to build a basic WordPress theme here. But once you have learnt this, you will be able to beautify your theme further to greater extent. You can then experiment and make changes as you may like.
So, to start with, in WordPress finder, land at your theme folder, “wp-content > themes”. Here you will see a list of default WordPress themes and index.php. Here you need to create a directory for your WordPress theme, for example ‘mywordpresstheme’.
- style.css – Create a style.css file in theme folder and change the author, name, description, and more.
- index.php – Copy index.html and blog.css files from your template blog source code and paste it to your theme folder. Now change the file name index.html to index.php.
You have now created your theme.
Go to your WordPress dashboard, now click on Appearance > Themes. Your custom theme will be visible along with other default themes. Just activate your theme and it will come live on your URL.
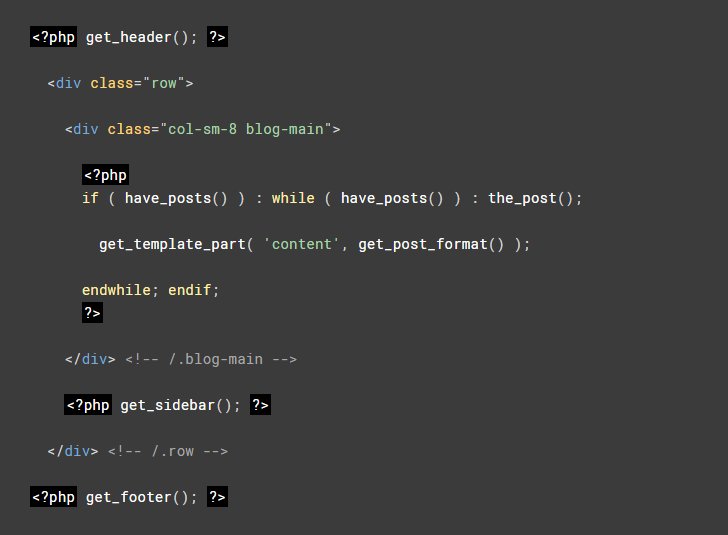
Break up your index page into sections
At this time, everything is saved in index.php and it needs to be divided into four sections, “header.php for Header codes, footer.php for footer codes, sidebar.php for sidebar codes and content.php for all content/posts”.
- header.php – The header contains the codes that define head styles & the main/top navigation of the theme. The only new addition here is, to add this code <?php wp_head(); ?> right before </head> along with adding <div class="container">
- footer.php – Just same as we did in the header. Footer will include all that is visible at present on the index.php. As in header, add this code, <?php wp_footer(); ?> right before </body> along with somewhere in footer section <!– /.container –>.
- sidebar.php – Add all the relevant Sidebar codes to this page without any major change.
- content.php – All the content, “blog posts and main content” of the website would come in this section.
- Index – The remaining index file would be quite sparse by now. But you need to link all different sections from this page, like in the image below. And once this is done, you can re-load the URL to see the entire site (basic template) live.

Theme Settings
Before adding content/pages/posts, you have to configure main settings of WordPress. Like, if you want to change the title or description of the blog, you would ideally want to use the WordPress dashboard & go to Settings > General and then set your title or description.
But in order to let this function work, you need to make some changes in header.php. Here is what you need to add:
- Replace contents of the title tag and main h1 with <?php echo get_bloginfo('name'); ?>
- Replace contents of description tag with <?php echo get_bloginfo('description'); ?>
Insert content
This is the most important function of creating a blog theme – dynamically inserting content. In WordPress it is done with The Loop. For example: In dashboard, click ‘Posts’, it shows a “Hello, world!” post by default. Now our goal would be to display this post in the live blog.
For this, we have to include the loop to index.php, as in the image below.
If you noticed, the only thing remaining inside your loop is content.php. So now you need to open the content.php file & change its contents as shown below. And once this is done, try adding second post to check that the loop does not have any errors.

Make Sidebar Dynamic
If you have Archive and About options in the sidebar, here is what you need to do.
- For Archives: Just replace all the li codes from under the Archives with this code, <?php wp_get_archives('type=monthly'); ?>
- For About section: We recommend pulling information from your user account (profile). So whenever you update your description in the profile, it automatically changes on your website. And for this to happen, add this code under ‘About’ section of sidebar.php, <p><?php the_author_meta('description'); ?> </p>
Navigation and Pages
In wordpress there are two aspects of content, “Pages and Posts”. The pages are typically sections where you put website content, while posts add up to your blog. In order to add more pages to your navigation, open header.php and add this code in place of codes to all inner pages under navigation section – <?php wp_list_pages('&title_li='); ?>
wp_list_pages(); would list all the website pages you add to unordered list. While 'title_li=' would tell the code not to add “Pages” title before the list.
Conclusion
This tutorial was just an introduction to theme development, to show you how a new theme fits together with WordPress and what all resources are needed in the process. There is definitely a lot more to learn about WordPress themes. Although it is not very difficult to develop even the most complex magazine-style themes with multiple custom plugins and options pages, once you know how to fit things together, you can find your way.
If something is unclear, please do let me know by posting your comments below. Your feedback would be greatly appreciated!